|
Each print is unique; each print is hand-crafted; each print has a story in its creation.
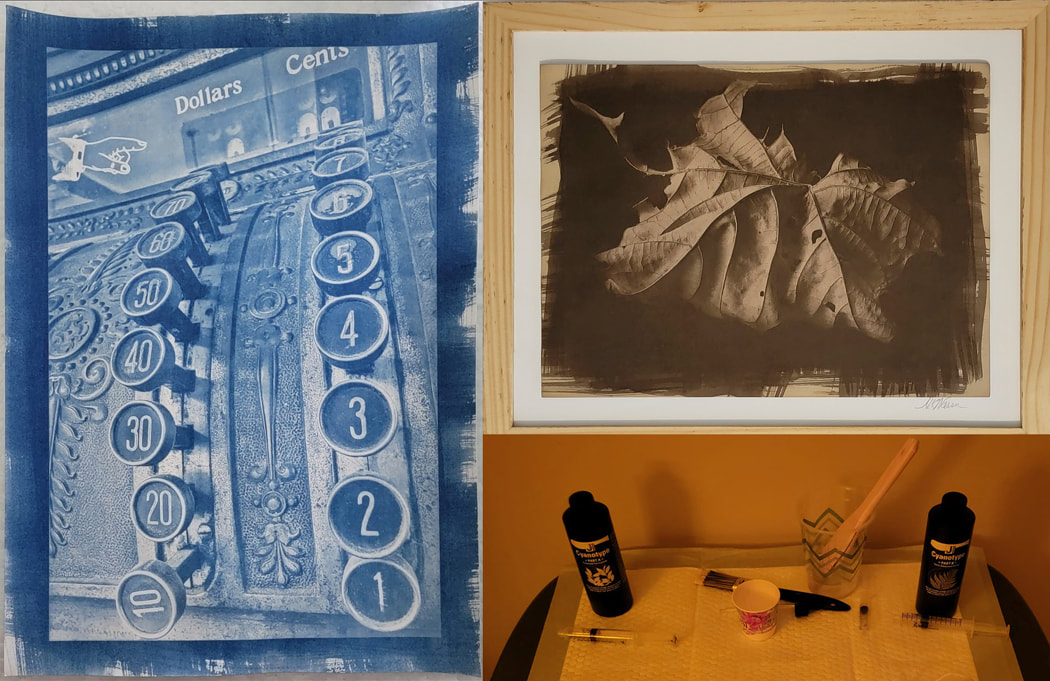
In my cyanotype prints, I'm combining 21st century technology with a historic alternative photographic process dating back to the beginnings of photography. This process uses iron-based chemistry combined with contact printing, unlike traditional darkroom methods based on silver compounds and projection or enlargement of negatives. From the early 1840's, the cyanotype process was used to record botanical specimens as well as to produce blueprints and photographic images. Now many artists like me are exploring it as artistic expression and experimenting with its various forms and manipulations. "My mix of digital & analog processes comes as a necessity, the digital filling the gaps of the analog & the analog filling the gaps of the digital." Anna Malina Zemlianski As I start a piece, I choose a digital image with both visual appeal and a visual story, one that has the technical characteristics to prints well in monochrome. I edit in Photoshop to monochrome, especially looking at the tonal range and midtone details, then I apply a tone map I've created and tune to my specifics--my process, my printer, my paper choice. I print this onto an inkjet transparency to produce a digital negative the size of the intended print, first with a grayscale 10 step strip for analysis and then the adjusted image for the final print. Now, off to the dim room, not a darkroom just without sources of UV light. The chemistry is mixed fresh for each batch of paper I coat since the chemicals have a very limited usable time once mixed. I've been using mostly heavy watercolor paper but am experimenting with other materials as well. Using a flat, protected surface, I measure the appropriate amount of chemical onto the middle of the paper and brush it across for an even coating using a natural Hake brush with a light touch. Brush stroke may be visible or white edges of the paper may remain--each coated sheet is different because it's done by hand. The coated paper needs to dry flat in a dark place, for me usually inside a flat box I keep for that purpose. Dry coated paper can be stored in the dark for several weeks. When it's time to make the print, I put the digital negative ink side down on the dry coated paper and flatten everything under glass in a contact print frame. Now for the UV light. The sun is an excellent and free source of UV light, but UV intensity varies with season, time of day, cloud cover, and atmospheric conditions. I've found that an indoor UV lamp is more consistent even though it needs a longer exposure time. I'm using an LED UV lamp with the optimal 365nm wavelength mounted inside a cabinet so as to avoid eye exposure to UV. Varying the exposure time gives different results in the print, but I usually use the "maximum black" time I determined by previous testing. Once the paper is exposed to UV, it is removed from the contact printer and rinsed in water. Yes, plain tap water as long as there's no chlorine. In some cases, I first use a brief rinse with dilute vinegar to darken the print and bring out midtones; all prints are rinsed about 15 minutes with at least two complete water changes. The rinsing process removes the ferric salts in unexposed parts so they turn white when rinsed; over rinsing may lighten the print or having used a surface that does not absorb the chemicals may cause them to simply all rinse off. After a minute or so of hanging to drip off excess water, I dry my prints on flat absorbent paper. As the print dries, the blue will deepen in color over then ne3xt 24-48 hours. Never do the final evaluation of your cyanotype print while it's wet! Then come the experiments with toning. Mostly I'm toning prints after they dry full, but the wet toning process produces different and interesting effects as well. The dry print needs to be thoroughly rewet but not oversoaked so as to lighten it. Usually I bleach the print in an alkali solution of sodium carbonate, washing soda. It's personal preference how long I bleach a given print; I may bleach only enough to take down the shadows or I may bleach until all the blue is gone leaving only a faint yellow trace of the image. Then I dunk in water to stop bleaching and into the acidic toning solution it goes. In general, toners need some level of tannic acid to tone well; tea either black or green, coffee, and yerba-mate tea work well. Each gives a slightly different tone and effect; the strength of the toner and the time immersed create different effects also. It is the artist's imagination and experimentation! After toning to desired effect, anywhere from 10 to 30 minutes, the print needs to be washed in water again and dried. Cyanotype prints can be selectively toned or bleached; they can be painted with watercolors; they can have other alternative processes applied on top. The possibilities intrigue me!
1 Comment
|

 RSS Feed